Organize Your Jewelry, DIY Style

Do you have 30 minutes? It's time to get crafty!

Have you ever had one of those days where your want-to-do list keeps tapping you on the shoulder, looking at you with puppy-dog eyes, saying, “Please. Please pick me! I’ll be fun and fulfilling, I promise.” And then there’s your much-longer need-to-do list, who is managing to give you panic attacks every time you get a glance of it out of the corner of your eye. Which one would you pick? Here’s a DIY project that mixes both together to give you a greta-looking jewelry organizer. And who knows, maybe you really NEED somewhere to organize your jewelry today. You’ve just had it with the tangled necklaces and mismatched earrings. No judgement, just saying.

What you’ll need (30 minutes to make):

  • Foam core, preferably white, unless your fabric is dark
  • Self-healing cutting mat, or other surface (like cardboard) that is ok to cut into
  • Hot glue gun, plus extra glue sticks
  • Embroidery hoop, around 18″
  • Fabric scissors
  • Pencil, or pen
  • X-ACTO knife
  • Decorative tacks
  • Small cup hooks
  • Fabric of your choice (for example, 5/8ths of a yard for an 18″ embroidery hoop)
  • 1 Nail (not pictured)

Instructions

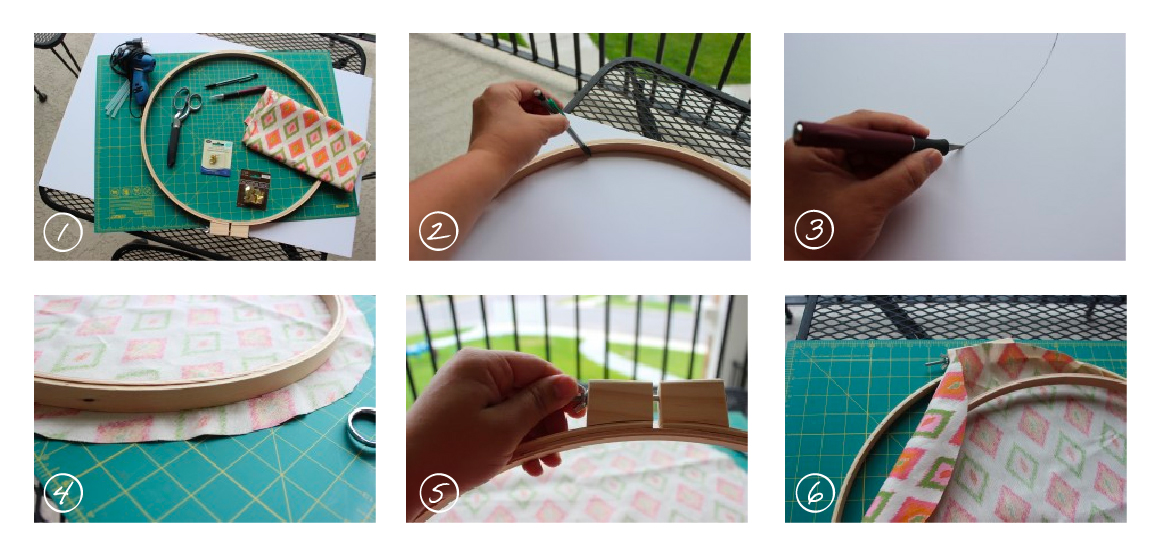
  1. Gather your supplies.
  2. Trace the inside of the hoop onto the foam core with your pencil.
  3. Place your foam core onto your cutting mat, and you will cut along your line very carefully with your X-ACTO knife. Take it slow. There’s no rush. Tip: Turn the board as you cut, rather than walking around the table to cut the circle out. Once it’s cut out, try “popping” it into your hoop. It should fit pretty snug, and you should have to finagle it in there, without bending the foam core, of course. If it needs some trimming, have at it. But remember, take it slow. Small slivers off at a time, if needed.
  4. Once the foam core fits to your liking, take it out. Lay your fabric out, wrong side up. Trace loosely with your pencil onto the fabric about 2-3 inches wider than the hoop. Then cut it out.
  5. Loosen the hoop by unscrewing the screw at the top, so that the inside hoop comes out.
  6. Layer the outside hoop on bottom, then fabric face-down, then inside hoop. Push the inside hoop in so it’s snug and fabric is tight.
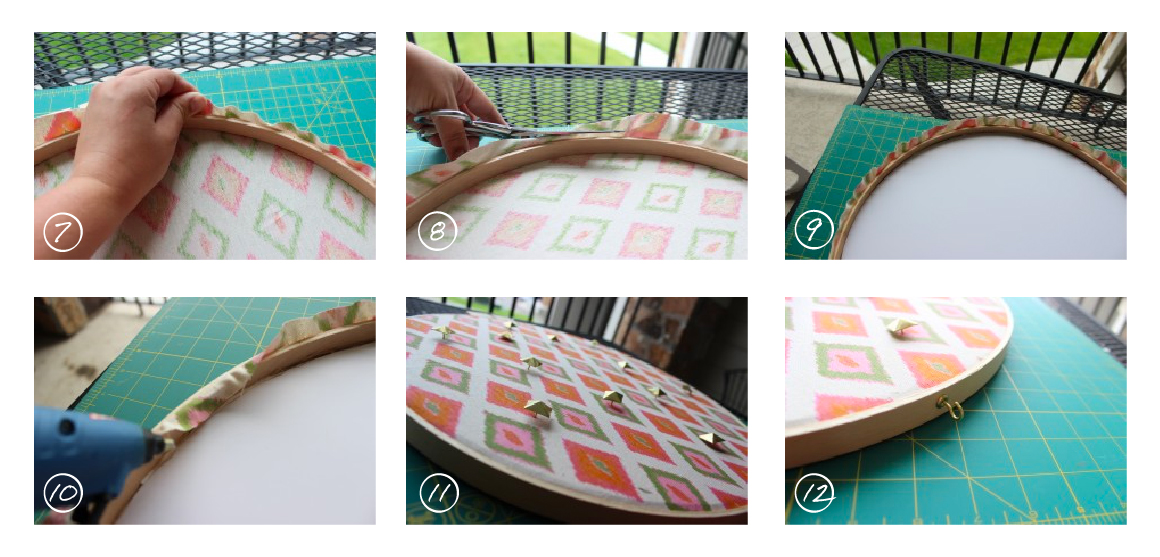
  1. Pull the edges of the fabric up so that everything is snug. Trim the extra fabric so there is about 1″ of fabric sticking out of the hoops.
  2. Pop your foam core back in and press it against the fabric.
  3. Hot glue around the edges of the foam core. Hot glue the fabric down towards the foam core.  You’re not going to see the back, so don’t worry about making it look pretty.
  4. Flip it over to the pretty side. Put your tacks in however you’d like.
  5. Screw the hooks into the bottom of the hoop. These are so teeny that you can just do it with your hand.
  6. Now you’ll just need one nail to put into your wall. Nail it in there, leaving the head of the nail an inch or less out from the wall. Hang your hoop onto the nail. You might need to do some teetering to make it hang straight. Hang your bracelets and necklaces on it and you can now cross that pesky need off your list.

Recent Articles

Alex Rivera

July 10, 2023 • 3 min read

Alex Rivera

July 10, 2023 • 2 min read

Alex Rivera

July 7, 2023 • 2 min read

Back to top